Wednesday, December 1, 2010

Not a card but still crafty

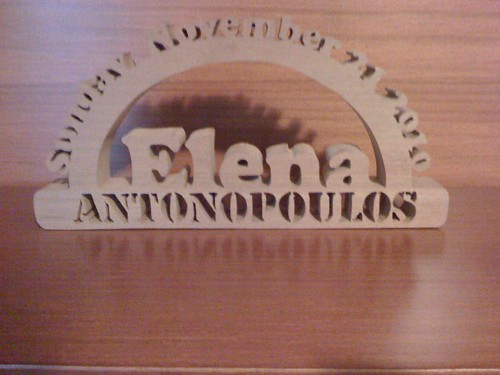
I just had to pop on and share this beautiful peice of art that was created for the baby by the caretaker at my husbands school.

I was just flabbergasted when he came home with it yesterday

Enjoy

Crafty gift

Saturday, November 27, 2010

Scheduled - Wedding Cards

HAALLLOOOO everyone. This is a scheduled post as I'm taking care of a newborn and hopefully myself as well !


M brother got married in October and here are some cards I made for him (one from me and one from my sister)


Their colours were Black and silver, and I wanted the cards larger so I didn't have to fold monetary gifts into a A2 card. ALSO, I guess it just makes you feel more important to walk into a formal even with a larger card. My MIL request all her cards in 5X7 !!

First up is a scalloped creation from me. I loved the layer of silver frills on the bottom of this. PP is Making Memories wedding paper, and it's great with a teeny bit of sparkle.
Used labels 5 for the main image, and the sentiment from Big and Bold wishes from PTI (flourish is theirs as well) Tied off with some black satin ribbon.


Next up a card inspired by Regina Magnum at the stampin bean. She had this great layout and I thought it would be perfect with this paper. The panels are popped up on dimensionals, and there is a sentiment beside the row of rhinestones although hard to see (It says "And they lived happily ever after) from PTI"s Big and Bold wishes as well. Ribbon is SU gray taffeta.


Thanks for looking !!

Tuesday, November 23, 2010

Soft Congrats

Hello blog land of the future. Scheduled some post for you while I"m taking care of newborn ... and myself!!
Then after making this card, using WM stamps, Claire comes out with a sketch that it fits exactly. SO I'm going to link it up there !!

I wanted to make a card and was really inspired my Melissa J (Melissa's paperie, link on my left) Her cards are so soft and pretty, and she makes awesome use of her background stamps.


Started with a base of PTI blueberry sky, and a mat of Fine Linen. Stamped the lace stamp from Faux Fun onto my card stock diagonally in Marvy Matchable Salvia blue - a great match for Blueberry sky.

Die cut and stamped another BS piece (that blueberry sky in case your mind took it somewhere else!!!) and filled in the oval with some more Fine Linen. Decided I need to take some lessons on sponging, or invest in the ranger tool or SOMETHING to make my edges look soft and distressed. I wet this whole piece with my aqua painter after sponging to try and soften it up a bit. ANYWAYS.....sentiment is from WMS Say it with style, frame is from Vintage labels 4, Ribbon is PTI BS as well as SU's Very Vanilly grosgrain which is a good match for Fine linen (but not so much with Very Vanilla!!)

Added the pearls as it needed something. Not sure if this was the thing but they're there!

Thanks for looking !!!

Saturday, November 20, 2010

Baby girl cards

I thought this post would be sorta appropriate. I scheduled some posts as I'm most likely giving birth and caring for our new little bundle of joy - a girl set to come any day now. SO I thought I'd put up some baby girl cards I had made. HOwever, now I need to go in and edit it as I"m still preggo !!


Working of files on my computer so these were taken in the car on the way to my cousins who had just had a baby girl a few months ago.

First up is a card that I made using some cute Martha Stewart Paper. It's textured and kinda reminded me of a quilt so I matted it on some vintage cream that I cut with my MS rotary cutter to make it look like a quilt.
Used Baby button nits for the rattle, and some PTI silk ribbon copic dyed.
Some Sweet Blush and Raspberry fizz finish it up.


Next is a soft little bear card with the curtest button tummy ! Coloured the bear with some copics onto Kraft to make it really soft. Corduroy brad for bear tummy, and mounted on a distressed (tea dye due) cream mat. The background is stamped with Background Basics Petal Power onto sweet blush.


Thanks for looking.

Friday, November 19, 2010

HUGE Blog candy at Wee Memories


UM.....wow. You must go there now and enter !! Deadline is Nov 30th

Thursday, November 18, 2010

Mojo sketch...and some crow

Isn't that what it's called when you eat your words?? Eating crow ??
A few posts down I made a discovery about distress inks combined with water based markers and was so smug about not needing a ton of colours. Well I got the ink applicator and a few more colors and I'm addicted!!!!!!!
However, I'll try this technique again with the markers and ink applicator and tell you how it goes.

This next card was made for mojo's sketch 165 .

Stamped the Knit image from in versamark and embossed with clear ep. Sponged broken china distress ink onto layer.
Kept sponging.
Sponged some more.
Stamped circle and punched with 1 3/4 punch. Stamped snowflake and added bling.
Had a hard time with the angle...but forced myself to do it so I had to compensate by straightening sentiment from PTI made of snow.


And I just had to ask....does anyone else do this ??? Faux knit layer, snowflake AND sentiment are all stamped on the back of the white paper that tells you what colour your PTI cardstock is. When I put my CS in the hanging folders I couldn't bring myself to throw them away and now I have plain white CS (that works great even in finicky punches) to last me a while !!!


Stamps - Vintage Circles Small and Faux Fun Waltzingmouse, Snowflake serenade and Made of Snow PTI
Paper - Pure Poppy and White PTI, Tempting Turquoise SU
Ink Broken China Distress Ink, PTI Pure poppy
Ribbon Pure poppy saddle stitch PTI, FElt PTI Pure poppy, Martha Stewart coarse glitter in crystal
Spellbinders labels 5 die, PTI Victorian lace border die and limitless layers die

Wednesday, November 17, 2010

Evolution....and Resolutions


Strange title for a blog post I know. But I was thinking about my style and confidence as a card maker. I've been doing this for about a year now. I love to create, but felt much better re-creating. Or I would create many elements and never know how to pull them together on a card. I must say, now that I'm starting to branch out on my own I'm enjoying it SO much more. Figuring out who I am and what my style is - or what it is for that day! SO, here is a thank you card I made in about 20 minutes (another plus to this great confidence surge!!)
I started off with a tag that I stamped WAY BACK when Clarie's Very Vintage Christmas was released (that's a whole year ago !!) I pulled it out of my box (using my pre-stamped images is one of my new crafting resolutions!!) Also, after some discussion on the PTI board about distress inks I went out and bought 2 colours to add to the one I had, as well as an ink applicator. I distressed the tag with worn lipstick and it blended beautifully into the already stamped tag. Thank you is from Say it with Style, and cream layer is stamped in the faux lace image from Fax Fun - all Waltzingmouse. PP is PTI's library ledger paper, and base is Vintage cream. My little flower was die cut with MFT"s rolled flower die, and felt leaves behind it are from SU. PTI silk ribbon, and a little trio of rhinestones (inspired by Laurie Beth) to finish of the taggy part. I had so much fun distressing this tag, I cannot believe I waited this long to try the distress inks !!
AND......Just had to take this AFTER Picture of my desk. Yes, this pic was taken AFTER i made my card.
So proud of myself !! My first card made in my newly organized space feels great.
What would feel even greater is if little miss decides to make her appearace soon .... passing your due date is NO FUN !!